If you're beginning to scale up your product photography, you've probably heard of Adobe Lightroom. Lightroom hits the semi-professional sweet spot between DIY smartphone photographers and full on studio professionals using Capture One.
Lightroom (Classic) is a wonderful program that has several useful features for product photography, including tethering, presets, and batch editing. You can use Lightroom to efficiently create consistent, high quality imagery.
In this post, we'll answer several questions you may have about Adobe Lightroom, like:
- What is Adobe Lightroom?
- Which is better for product photography: Lightroom CC or Lightroom Classic?
- What are alternatives to Lightroom?
- How do I use Lightroom for product photography?
And then we'll walk you step-by-step through three key features of Adobe Lightroom for product photography:
- Tethering during a photoshoot (Lightroom Classic)
- Using presets to adjust images as you capture them
- Batch processing images you already have
By the end, you should have a solid understanding of which Lightroom plan is right for you, how to use Lightroom during a photoshoot, and how to adjust your photos efficiently.
Table of Contents
- What is Adobe Lightroom?
- Adobe Lightroom Classic - Professional Choice
- Adobe Lightroom CC - Casual Choice
- What are the alternatives to Adobe Lightroom?
- How to Tethered Capture with Lightroom Classic for Product Photography
- Step 1: Open Lightroom and Catalog
- Step 2: Tether your Camera & Computer
- Step 3: Shoot
- Step 4: Create and Use a Preset
- Step 5: Export Selects
- How to Batch Edit Images with Lightroom
- How to Automate Retouching
First, the groundwork.

Lightroomm Classic splash screen
What is Adobe Lightroom?
Adobe Lightroom is software designed to be used by photographers for photo management and editing. Put another way, cataloging and adjusting. If you're familiar with other Adobe products, it's like a lightweight composite of Adobe Bridge and Adobe Photoshop. But that's selling it short.
You can import, organize, edit, and export images. You can star favorites, create collections, search, and share images. You can adjust (edit) individual images, perform batch edits, and save sets of adjustments as "presets."
All adjustments made in Lightroom are non-destructive. By "non-destructive," I mean that every image edit Lightroom makes can be reversed. In essence, Lightroom retains your original images and keeps a record of your edits, then applies them when you export your images. You can come back minutes, hours, days, months, or years later and reverse the edits.
Lightroom has been around for a while (2007!), but it underwent a major change at the end of 2017. At that time, it was split into two programs with many shared features, but significant differences: Lightroom CC and Lightroom Classic CC.
Nobody but Adobe calls it "Lightroom Classic CC," because that's just too confusing. From here on out I'll just call it "Lightroom Classic."
In brief, Lightroom Classic is for computer-first power users while Lightroom CC is for mobile-first casual photographers.

Adobe Lightroom Classic - Professional Choice
Why this is our choice for Product Photography: Tethering, file renaming, export types, adjustment history, local image support, more advanced editing
This is a continuation of the original Lightroom, and despite the "Classic" tag it's still seeing frequent updates.
That means you can still connect your camera to your laptop and take photos with a press of the spacebar. You can make edits to a single image and sync it to the rest of your catalog. You don't have to have images loaded to Adobe's cloud before editing them, you have more editing options, and you can reverse individual edits (as opposed to CC's all-or-nothing restore).
You can also do things that seem so laughably basic that I was incredulous the first time I saw them missing from CC: you can rename your photos and you can export them as TIFF, PSD, or original RAW format. I understand why CC doesn't do that—I think—but their elimination basically makes the decision for any professional photographer.
Adobe Lightroom CC - Casual Choice
Why it doesn't work for Product Photography: No tethering, can't rename files, only export JPG, need images on Adobe's cloud server for many features
What it does well: Mobile editing, cloud backup, easy to use, syncs across devices, AI powered search, sharing
Lightroom CC is an awesome program—for an amateur photographer who doesn't shoot in the studio. It's made more accessible by removing a lot of features that most people probably don't care about, like tethering.
Adobe's tagline for Lightroom CC is "the cloud-based photo service," and that tells you where their focus is: mobile. All photos are backed up to the cloud automatically. There are apps for iOS and Android that allow you to edit full-res images, and all activity syncs across all your devices.
The AI powered search ("Adobe Sensei") doesn't rely on manually annotating photos. It's not reliant on metadata at all. Instead, it uses image recognition technology to try and find "cats," "cactus," "lake," or whatever you search for.
It has plenty of excellent editing abilities, like light adjustment, color adjustment, healing, linear and radial gradients, and presets. You can perform batch edits, though it's not quite as intuitive as with Lightroom Classic.
This is a great program—but it only outputs JPG files, you can't rename files, and you can't tether. The streamlining for amateur accessibility is too limiting for professional use.
What are the alternatives to Adobe Lightroom?
Lightroom is far and away the most popular software in its category, but it's not the studio professional's choice. That title belongs to Phase One's Capture One.
Every major e-commerce photo studio I've been in uses Capture One. Every single one.
Lightroom is more accessible than Capture One, and much cheaper. It's made to be an entry point, and it's made so well that it can be useful far beyond that.
But Capture One is made specifically for professionals. It's extremely customizable, has much more advanced image editing ability (like layer masks and sophisticated color adjustment that Lightroom punts to Photoshop), and more powerful tethering controls. For example, you can output your camera's live view and adjust fine details of your camera's settings.
It's also simply faster and made to handle higher performance tasks—again, tethering.
The pain comes with the price point: at the time of this writing, it's $299 for a perpetual license or $20/mo for a subscription. Note: there are cheaper versions available specifically for Sony and Fujifilm cameras.
That perpetual license option is important. Many professionals are justifiably wary of locking all their assets into a subscription based service, no matter how much better of a deal it appears. You never know when prices will get hiked, features taken away, or you'll want to move to another ecosystem without losing everything.
If you're looking to build a real deal dedicated high volume photo studio, Capture One is for you. You can stop reading right now ;-)
If you're an extremely budget conscious amateur who's feeling particularly adventurous, you might want to give ACDSee Ultimate or Corel AfterShot Pro a twirl (you may recall Corel from PaintShop Pro). They're cheaper and have perpetual license options, but they're less polished and have fewer features than Lightroom.
For everyone else, Lightroom it is.
Now let's get into descriptions of how to actually use it!

How to Tethered Capture with Lightroom Classic for Product Photography
Why should you tether? Time is money.
Don't wait until after the shoot to see exactly what your product images will look like. When you tether, you can see your photo immediately on a full-size screen.
Not only that, you can create a "preset" that will perform adjustments as you shoot, saving you time in post-production as well as allowing you to see the final image instantly.
It's a simple but hyper-efficient workflow that reduces reshoots.
To demonstrate tethering, I enlisted the help of Los Angeles based photographer Shauna Murray. Below we'll provide step-by-step instructions, with screenshots and additional notes from Shauna.
Shauna used the following tools.
Camera: Nikon D5300
Computer: MacBook Pro
Software: Adobe Lightroom Classic CC
Not sure if your camera can tether? Most DSLR can, but to be sure, check Adobe's tethered camera support for Lightroom Classic CC and Lightroom 6.
Don't be fooled by cameras that say things like "wireless tethering," or assume that because your camera has a micro-USB port you can tether. Those two features may just be for offloading photos from the camera, not real live tethered capture.
Step 1: Open Lightroom and Catalog
Either open an existing Lightroom catalog you want to use, or open the app and create a new catalog from there.
Shauna's advice: less is more, when it comes to catalogs. She says:
"While somewhat a matter of personal preference, unless you are taking thousands and thousands of photos every month, multiple catalogs can actually make it more difficult to find images if you need to go back and search for them later. You can also store metadata and develop presets for related images in the same catalog so you don't have to start over with new presets every time you shoot. IMHO it's easier to have all related images in the same catalog but keep them in separate, clearly labeled folders."
Once you're in the catalog you want to use, create a new parent folder for the images. You'll be able to create subfolders later for specific items, product lines, etc.

Add Folder

Create New Folder (images will go into subfolder of this)
Step 2: Tether your Camera & Computer
Tether (connect) your camera to your computer with a USB cord that's compatible with your camera. Your camera probably came with one, but if not, don't worry! It should just be a standard USB to microUSB cable. You've probably got half a dozen lying around from your various gadgets, and they're just a couple bucks on Amazon.
- Turn the camera on
- In Lightroom, "File" > "Tethered Capture" > "Start Tethered Capture"
- In "Tethered Capture Settings"
- Create a new folder for the set of images you're about to shoot
- Assign metadata, like copyright and keywords
Now you're ready to begin the tethered capture.

Start Tethered Capture

Create folder photos will go into

Create naming schema, set metadata and keywords
Step 3: Shoot
A capture strip will pop up in your new catalog library window after you have saved your settings. This is where you will see your camera connected and all of the camera's current settings. Make sure settings like ISO, Aperture, and Shutter Speed are all adjusted according to your needs. Once they are all good to go, snap your first photo – which you can do straight from the computer, avoiding camera shake – and watch it appear on your computer screen.

Capture strip shows camera settings and tethered capture settings

Captured photos appear on-screen
Step 4: Create and Use a Preset
Take a few photos and adjust your camera until you are happy with your exposure and camera settings. Once you have a photo you like, open the Develop tab to make adjustments like color correction and contrast, then save these adjustments as a "preset" that you can apply to the photos as you're taking them during the tethered capture. Since all of the photos in the set will likely be of the same subject in the same environment and lighting, the preset should help reduce the amount of time spent editing after the shoot.
- "Develop" tab
- "Presets +" on left menu
- "Create Preset"
- Name your preset and press "Create"
To use your newly created preset, you must assign it in the capture window. Click the "Develop Settings" dropdown in the capture bar, and select your preset from the dropdown menu. It will now be applied to all images you capture moving forward, allowing you to see edited images nearly instantly and avoid reshoots!
You can use the same preset throughout this shoot, and even future shoots in the same location. If you shoot at a different location in the future, or if conditions change at your current studio, create a new preset.

Develop > Presets + > Create Preset

Check all Develop settings for Preset

Select new User Preset from Develop Settings on capture bar
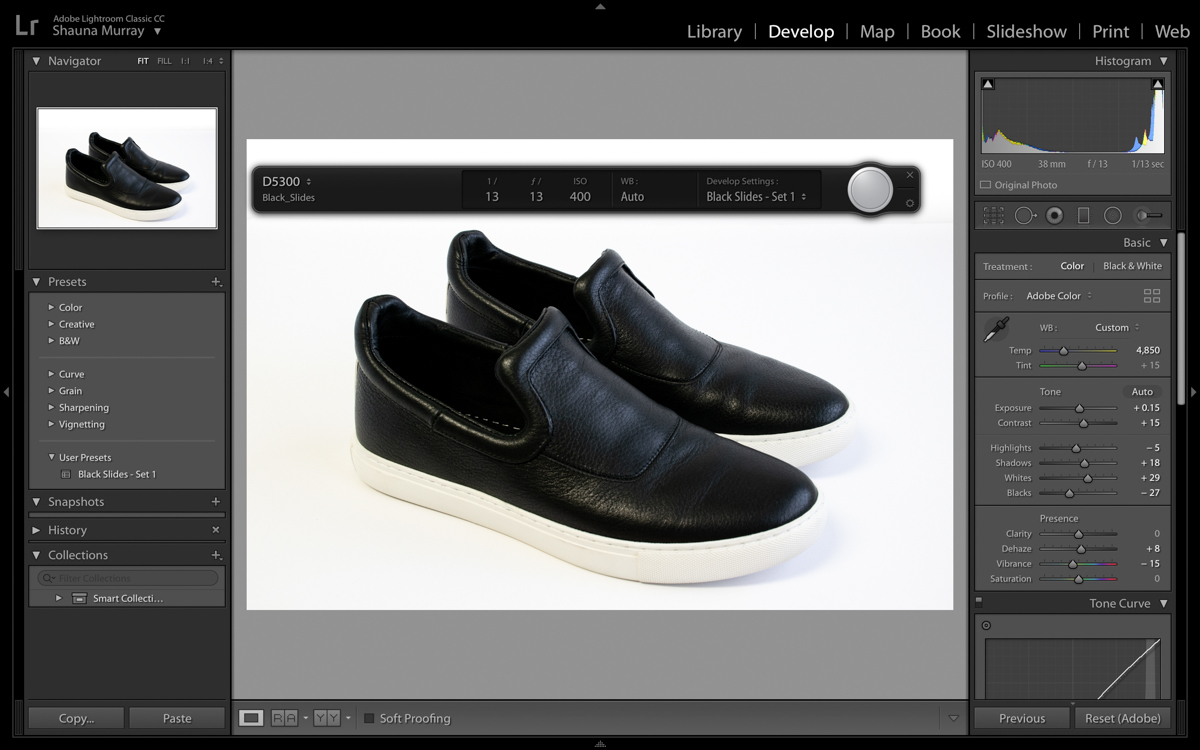
Captured images have Preset applied
Step 5: Export Selects
When you're done shooting, use the Library tab to review and rate your images using flags and stars. Select the final images you want to use and find "Export" either in the File dropdown menu or by right-clicking anywhere on the highlighted images.
Choose the destination, file type, and name for the selects then click "Export".

Export selects
How to Batch Edit Images with Lightroom
In addition to tethering and presets, one of Lightroom's most useful tools is the ability to perform bulk edits.
Remember, all Lightroom edits are non-destructive. That means you don't have to worry about making a mistake in batch editing and ruining all your photos forever.
In fact, you can come back minutes, hours, days, months, or years later and reverse all edits with a simple "Shift+R" on your keyboard. With Lightroom Classic, you can reverse individual adjustments, while in Lightroom CC reversal is an all-or-nothing reset.
That brings up an important reminder: there are two versions of Lightroom! "Lightroom Classic" and "Lightroom CC."
You might have seen tutorials for batch editing images in Lightroom, and wondered "What are they talking about? I don't have a 'Develop' tab, and I don't see any 'Sync' buttons!"
Lightroom CC does not have a Develop tab, Sync button, or other staples of Lightroom Classic. But what it does still have, fortunately, is the ability to batch edit images. You just have to take slightly different steps.
Below I'll give instructions on how to batch process images with both Lightroom Classic and Lightroom CC.
How to Batch Process Images in Lightroom Classic
We'll start with Lightroom Classic, because as we said above, it's our recommended choice for product photography.
The following demonstration is performed using Adobe Photoshop Lightroom Classic CC, 7.5 Release. AKA, "Lightroom Classic." It's the most recent release as of April 2019.
Yes, they include "Photoshop" in the official name and both "Classic" and "CC." Adobe is amazing at software and terrible at differentiating through naming.
To batch process product images in Lightroom Classic as part of your greater product photography workflow, you must: organize your images, import them, adjust one, sync adjustments to all, select favorites, and export final images.
1. Organize
What photos are you processing?
Let's assume you just finished a photoshoot and are working with RAW images straight from the camera. We suggest putting all your RAW files from the shoot into a single folder on your computer.
Organizing by shoot makes sense because lighting conditions will be similar, if not identical. That means the adjustments we make will be similar, too, allowing batch processing.
2. Import
Import all images from the designated folder into your catalog.
- Press the "Import" button
- Use the file browser to find the image folder
- "All Photos" will be checked by default.
- Press "Import"
Once all your images are imported into the catalog, we can begin adjusting.

Import images from your source folder into Lightroom
3. Adjust
At the top right of your app, you will see a row of menu links: "Library," "Develop," "Map," "Book," "Slideshow," "Print," and "Web."
We're in "Library" after importing. Select an image from the library. We'll use this single image to perform adjustments, and then we'll apply those adjustments to all other images.
After selecting an image, click over to "Develop" so we can make our adjustments. You should see a panel on the right side with a bunch of expandable menus. Each of those is a toolbox we can use to make edits. The primary menu, and the one we'll be using here, is named "Basics." It should be expanded by default.
We'll do some basic color correction using the "White Balance" dropper and the "Exposure" and "Contrast" sliders.
- Select an image in "Library"
- Click "Develop"
- Expand "Basics" if not already open
- Adjust "White Balance," "Exposure," "Contrast"

Adjust an image in the Develop tab
White Balance
Click the dropper tool up in the top left of the "Basics" tab, and mouse over the image to a spot that should be grey (this is where a grey card comes into play). Click your target and Lightroom will automatically white balance your image. If you're still not quite happy, play with the "Temp" and "Tint" options until you find the sweet spot.
Exposure
Brighten or darken your image with the "Exposure" slider. Don't use it just because it's there: if you got your lighting and camera settings right, you may not need any adjusting.
Contrast
Contrast will make details stand out by darkening dark mid-tones and lightening light mid-tones. Use it for subtle detail accenting. Don't go crazy, or your photo will look manipulated.
4. Sync
After you've adjusted your first image, it's time to apply those adjustments to all of your other images from the shoot:
- Select the rest of your images from the film strip at the bottom of the screen. *
- Press the "Sync" button at the bottom right of the "Develop" panel.
- A "Synchronize Settings" window will appear. Select the adjustments (typically all of them) you want to apply to the rest of your images.
- Press "Synchronize."
* If you don't see a film strip, look for an upward pointing arrow at the very bottom of the app. Hover over it to make the strip appear, or click it to make the strip permanently visible.
On-screen you will see Lightroom move through your images, performing adjustments on each image as it goes.

Press the Sync button

Synchronize. Typically select all or stick with defaults
5. Flag or Star Selects
The adjusting is done, but you still need to sort through your images to find the ones you want to use.
- Click an image from filmstrip
- Press arrow key to go to next image
- Press "P" key to flag images you'll use
- Press "5" key to star hero images
- Select "Flagged" from "Filter" dropdown in bottom right
Lightroom has two ways to quickly mark images as you review them: flags and stars.
Flags give you a binary choice: "Pick" or "Reject." After you've flagged images, it's easy to export your picks and/or delete your rejects.
Stars are a 1-5 rating system that gives you a little more flexibility. For example, you can use a 5-star rating to mark hero images and a 4-star rating for other photos you intend to use in your product listing.
Both methods have single key keyboard shortcuts: "P" for Pick, "X" for Reject, and "1" - "5" for stars.
You can use either system, or a combination. It's common to see people essentially use stars as flags, giving images either 5 stars or nothing. In that case, you might as well use flags and take advantage of the ability to quickly delete rejected images.
Using flags and then starring truly exceptional images works well for me.
After you've marked your images, sort your catalog by selecting a method from the "Filter" dropdown in the bottom right corner ("Flagged" or "Rated").

Filter by flags, stars, or both
6. Export
Up to this point, Lightroom has just been saving edit settings and previewing them to you. Because of its non-destructive nature, the source images haven't actually been changed.
Now it's time to actually edit the images and output them for use. To do this, we're going to export them into their own folder.

Adjust export settings and export
Select all your filtered images, and press the "Export" button. A window will open with further options. For the most part you can stick with the defaults, but you should pay close attention to a few of them:
- Click "Library"
- Press "Export" button
- Adjust export settings (see below)
- Press "Export" again
Export Settings
"Export To" - Create a new folder within the same folder that contains your RAW images and name it something descriptive, like "Color Corrected" or "Final."
"File Naming" - Create a naming scheme for your image files that will help you organize them in the future, like style numbers..
"Image Format" - You're almost certainly not going to want to stay in RAW format, but this depends a bit on your workflow. If you plan to perform further individual edits in Photoshop, you may want to export your images as PSD or TIFF. To save disk space, particularly if you're headed to the web soon, it's JPEG time.
"Color Space" - Stick with sRGB for the web. Learn more about the zen of sRGB color space, and why it's optimal for ecommerce.
Make your settings selections and press the "Export" button.
Ta-da! You've just batch processed your images.
How to Batch Process Images in Lightroom CC
We recommend using Lightroom Classic for product photography, but if you have Lightroom CC instead, don't fear!
You can still batch edit images.
The following demo is using Adobe Photoshop Lightroom CC version 1.5, AKA "Lightroom CC." It's the most current version as of April 2019.
1. Add photos
Add Photos then Add # Photos again
Pretty straightforward. Press the "Add Photos" button to add images from a device, your computer, or cloud sync. Select the photos you want, then press the "Add Photos" button again.
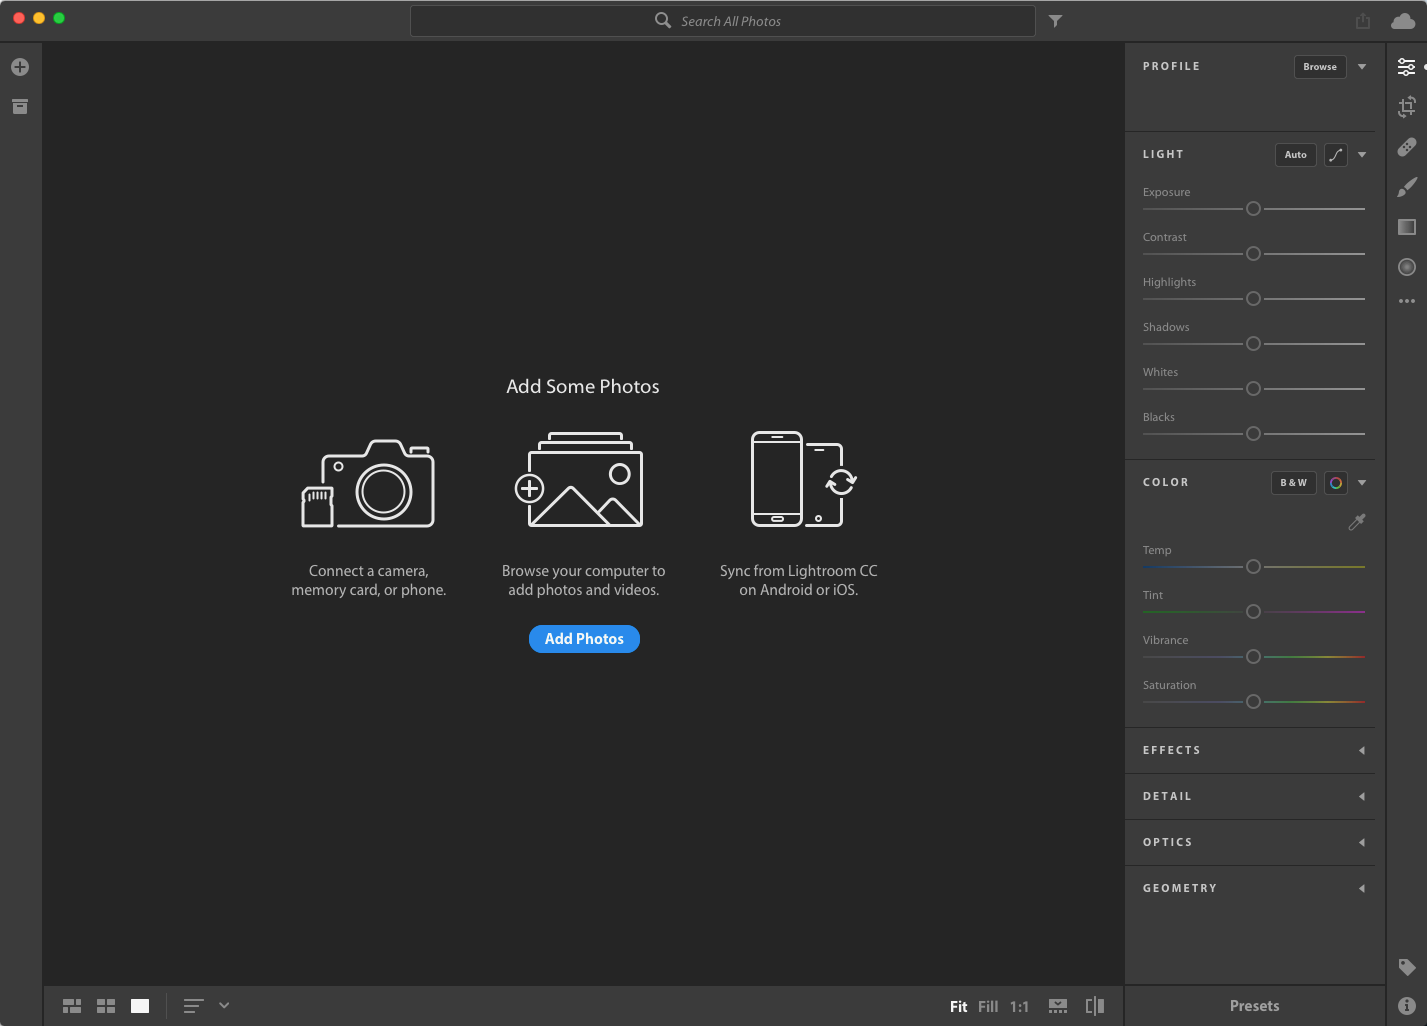
Add photos to Lightroom CC from a device or the cloud

Make selections and add photos
2. Edit your first image
"Edit" icon
Down the right side of your Lightroom window you will see a series of icons. They represent "Edit," "Crop & Rotate," "Healing Brush," "Brush," "Linear Gradient," "Radial Gradient," and an option to open an additional non-edit action menu.
We're in "Detail" view after importing. Select an image from the library. We'll use this single image to perform adjustments, and then we'll apply those adjustments to all other images.
We want to edit our photo, so click the "Edit" icon; it's the top-right icon that looks like filter sliders. This will expand a panel on the right side with several options: "Profile," "Light," "Color," "Effects," "Detail," "Optics," and "Geometry." Each of those is a toolbox we can use to make edits. Expand the "Light" and "Color" toolboxes, if they're not already open.
Color correct using the "White Balance," "Exposure," and "Contrast" tools and instructions we gave in the Lightroom Classic section. That basically means using the White Balance Dropper and dragging sliders until it looks right.

Adjust a single image
3. Copy Edit Settings
"Photo" > "Copy Edit Settings" or "cmd + shift + c"
After you've adjusted your photo, you can copy edit settings and paste them to other selected images. You can do this three ways:
From the top application menu, "Photo" > "Copy Edit Settings" to copy all settings, or "Photo" > "Choose Edit Settings to Copy" if you want to be more selective.
You can also use "cmd + Shift + C" on your keyboard, if you're a Mac user, to open up the "Choose Edit Settings to Copy" menu.

Copy Edit Settings
4. Paste Edit Settings
Select images from filmstrip, then "cmd + shift + v "
After you've copied your edit settings, it's time to apply them to the rest of your images. Select the rest the images you want to edit from the filmstrip at the bottom, and apply your edits with "cmd + shift + v."
Note: Don't use "Photo" > "Paste Edit Settings" to apply edits to a batch of images. For some reason, that will only apply edits to the single image currently in your Edit window. You need to use keyboard pasting to apply edit settings to multiple images.
How to Automate Retouching
The next step after Lightroom batch processing is typically to take your photos to Photoshop for further editing. Fundamental edits like background removal, cropping, and consistent product alignment and image margins can create a much better experience for your shoppers. Adding or ehancing shadows can ground your products, avoiding a floating effect on white backgrounds.
Retouching can smooth creases in apparel, remove lint, dirt, scuff marks, and create an even skin tone for models. You can take advantage of image compositing with effects like the Ghost Mannequin and Stacking.
If you don't have the time or desire to spend all day in Photoshop editing images, Pixelz retouching service makes it super easy to get your images professionally retouched, at scale, with a next morning turnaround. Take advantage of the free trial and get 10 images retouched for free!


