
Demonstrate fit and shape in product photos without models or visible mannequins
If you’re in the apparel business, you’ve faced the challenge of demonstrating a product’s fit without breaking the bank or distracting your customer. Customers need to see the shape of a product, and flat or folded displays don’t provide the necessary level of detail. Your product photography must show the products being worn, but models are expensive and mannequins can be alienating.
The "ghost mannequin” effect, also known as the "invisible mannequin,” “3D mannequin,” or “hollow man,” is a simple and powerful post-production technique for apparel product photography that solves the showcase problem. The ghost mannequin effect allows you to take multiple photographs of a product on a model or mannequin, and then combine the photos to remove the model or mannequin in post-production processing. The result is a lifelike image that keeps the focus firmly on your product.
All it takes is a plan and Photoshop instructions. We’ll show you how.
The principles are simple, but the execution can be time-consuming and requires practice to perform efficiently. We’ll cover the entire process in this blog post, from studio setup to finished product image, and by the end you will have a complete understanding of the invisible mannequin technique.
Photography assets and examples
At its most fundamental level, an invisible mannequin image is a combination of two or more images—also known as a “composite image.” The first photo is on-body. The second and any additional photos are flat views of any part of the interior of the garment that was blocked by your model or mannequin, often shot on a white background.

Garment on mannequin in the Photo Studio
Most invisible mannequin images are made from only two other images, but sometimes it’s necessary to use more. It all depends on the shape and cut of your product, and how much detail is covered by the model or mannequin in the on-body shot image. For some products, like with bracelets and watches, a mannequin isn’t involved, but you still want to combine images to get rid of props and manage difficult lighting. That type of compositing isn’t really an application of the ghost mannequin technique, but the process is extremely similar.
The best way for us to explain how the effect is created is to show you, so take a look at some more invisible mannequin product images and the photos that went into their creation. Pay extra attention to the foam board shots and how the inner areas of the product are opened for the camera.
By now you should have a pretty good grasp of the invisible mannequin concept and its principle photography requirements. Keep reading to learn the ideal way to set up your studio and capture the necessary images, or if you've already got mannequin images in your backlog.
Planning your photography
In order to create the invisible mannequin illusion, you will need to first photograph your product being worn by a model or a mannequin from the front and back.
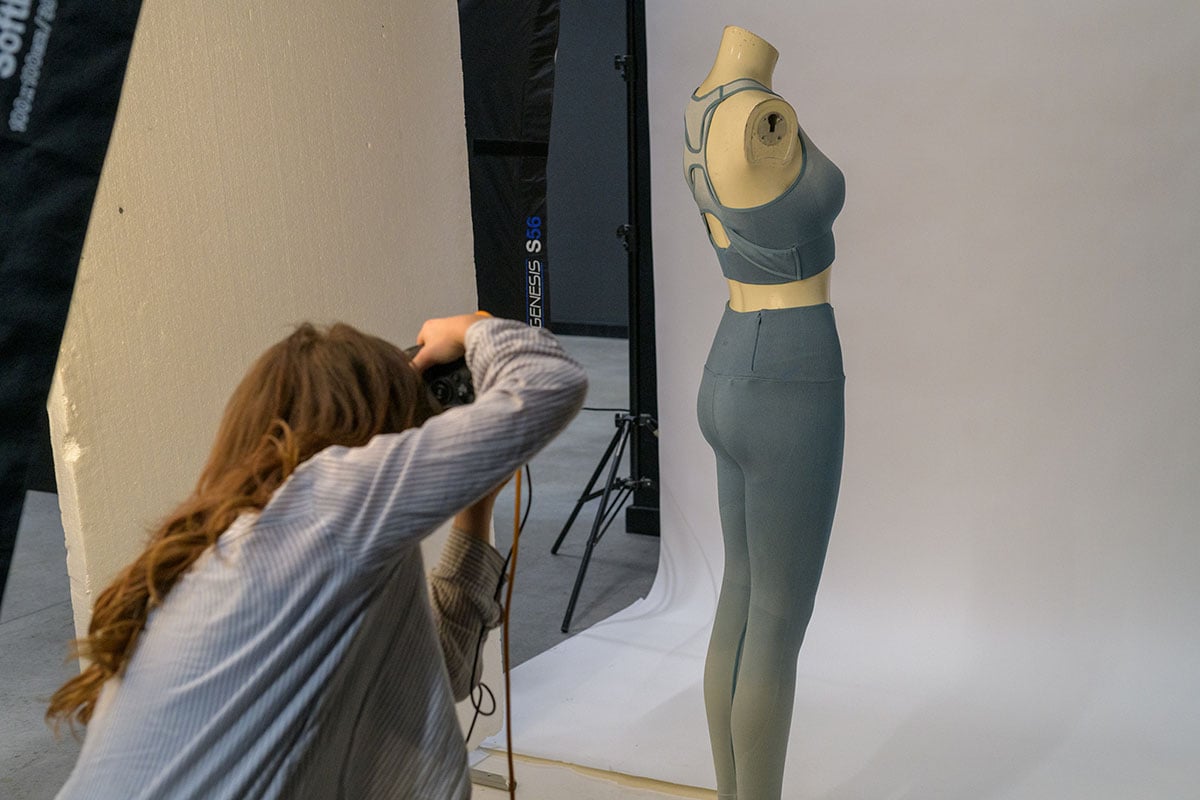
If you decide to use a model, make sure to use a static pose, as shown above. Your model should be styled minimally, and long hair should be tied up so that it does not obstruct viewing of the product. These details will make image editing much easier.
White mannequins tend to be non-reflective and can be made to blend into white backgrounds, which will make editing the mannequin out of the image an easier task. The best mannequins are lifelike and static. If your mannequin has arms and hands, then make sure that the limbs can be positioned out of the frame.
Make sure that your product fits your mannequin or model by using the right size or tailoring the garment to fit correctly. If your product has sleeves, make sure to position the sleeves so that the viewer can’t see down them.

Live model image
In order to execute the invisible mannequin technique, you need to be able to create high quality photographs in a studio setting. The lower the quality of your photographs, the less appeal the invisible mannequin effect will be able to add to those images. Camera and lighting techniques, equipment, and placement all come into play here, depending on each particular product that you’re shooting.

When photographing tops, it’s important to position the camera to be directly level with the chest area, whereas the camera should be positioned across from the hip area to photograph bottoms. Photographing a product from an angle that is either too high or too low may cause the garment to look tapered and inaccurate.
Below is an example of an image was taken at chest height, resulting in a flattering view of the product.


Using a telephoto zoom lens to capture your images can help to minimize distortion and provide you with the flexibility to move closer to smaller objects and move farther away from larger objects. Make sure that your studio shooting space is large enough to accommodate your camera and tripod, two studio lights and umbrellas spaced evenly apart on either side of the product, and a backdrop.
To create a 3D image with the invisible mannequin technique, you will first need to capture a front and back view of your product being worn by your mannequin or model. After that, you should style and hang your product on a piece of white foam board and photograph both the front and back views again; these foam board shots will allow you to include the inner areas of the garment once you combine the images together, as shown below. The necessary internal shots will be different for every product, and not all garments will require two internal shots.
Make sure to use the exact same lighting conditions for both the mannequin/model shots and the foam board shots. The easiest way to do this is to mark the mannequin’s/model’s location and make sure to place the foam board in exactly the same spot and at the same height. When the mannequin and back images are combined together in post-production, the result is a 3D invisible mannequin effect that demonstrates shape and fit at a fraction of the cost of a model.
Post-production processing
After you have captured the necessary views, it’s time for some Photoshop magic. You have two options for creating the invisible mannequin effect: do it yourself, or outsource to a professional product image editing service like Pixelz.
See our ghost mannequin service page or pricing page to learn more about how to get started and upload your image.
Option 1: DIY step-by-step Photoshop instructions
Creating the invisible mannequin effect is relatively simple, given that you own the proper post-production software (e.g. Adobe Photoshop) and that your products have been photographed correctly. Outsourcing this work may save your company a great deal of time and frustration, but if you really want to make the edits yourself, follow these seven simple steps to create your own invisible mannequin effect in Photoshop (skip to the end for video):
Step One: Open your files in Photoshop and create layers
First, you will need to open the mannequin image and the foam board image in Photoshop. Select your mannequin image and create a new background layer. Fill that layer in with white; it will serve as your overall background when you’re finished. It’s also helpful to label your layers so that you can tell them apart and remain organized.
Step Two: Use a selection tool to select the product in the mannequin image
Now it’s time to select the product in your mannequin image. Zoom in tight and choose your favorite selection tool: quick selection, lasso, or magic wand. All three can help you to accomplish your desired selection. Keep in mind that, in most cases, using a white background when shooting allows you to remove the mannequin easily because of the color separation between the product and the background.
Step Three: Refine and place your mask
Once you have selected the entire product, refine your mask so that it is nice and tight, eliminating all of the background and mannequin. This can be accomplished using the Refine Edge tool in the Select menu. Click OK in the Refine Edge dialogue box and place a mask on your shirt layer. At this point, you should see your product floating freely on the white background that you created in the beginning. If necessary, refine the mask slightly more and/or refine the product’s edges again to give it a nice, clean look.
Step Four: Rinse and repeat previous steps with the foam board image
Now it’s time to switch gears and repeat Steps One, Two, and Three on your foam board product image. This type of product image may seem a little odd at first, but having one to work with is important; photographing the product inside-out will allow you to show the inside back of the product, completing the mannequin illusion. We promise that it will look great in the end! Create a new layer, select out the product, and create and refine your mask.
Step Five: Combine the images
When both images contain tight, clean masks, drag the mask from your foam board image over to the image of your invisible mannequin product image. Organize the layers so that the foam board image is lower than the mannequin image. Then, adjust the positioning of the foam board layer and adjust its proportions so that it fits perfectly behind the mannequin layer, just below the shoulder in a rounded curve.
Step Six: Remove unnecessary parts of the foam board layer
At this point, it’s a good idea to “hide” your mannequin layer and brush out the unneeded parts of the foam board layer. You really only need to keep that neckline triangle between the shoulders. In the video below, notice how the string across the back is showing as well. It’s important to remember to remove that piece in the foam board image because it’s already in place in the mannequin shot. Once you’ve done this, double check that your layers are clean and that nothing is out of alignment.
Step Seven: Add shadows and save
Finally, add a shadow between the two layers to give the product some depth, and save a copy of the Photoshop file with all of the layers intact, just to be safe. Once you’ve saved the layer file, flatten or merge all of the layers together and save the image again as a different file. This final step will make your image look professional and realistic.
Want to see all seven steps in action? Watch the tutorial below for a step-by-step guide to the process.
Option 2: Integrate Pixelz into your workflow
If you want to do it yourself, that’s cool. But is it the best use of your time?
If you really want to be efficient and get it done at scale, fast, you can use Pixelz. Ghost mannequin retouching is built in to our online photo editing service: all it takes to enable is clicking a button.
Just follow these steps to set up ghost mannequin retouching and submit an order.
Create a Ghost Mannequin specification
First, create a specification that has Ghost Mannequin enabled. If it’s your first time creating a spec, use the “Guided Specification Setup” option.
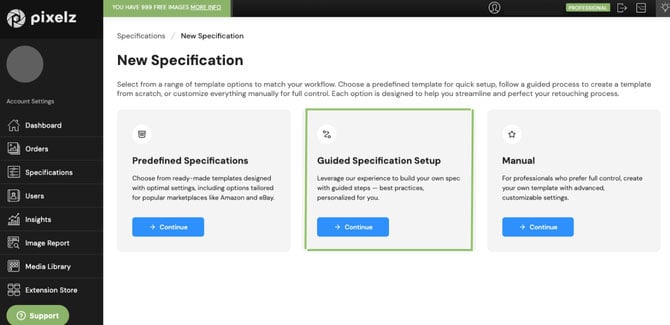
The Guided Specification Setup will ask you a series of questions about how you shoot your photos, and show you some examples of retouching options.
If you choose “Apparel” and “On Mannequins / Hangers,” after you make selections regarding image dimensions, background color, and surface and shape retouching, you’ll have the opportunity to add the “Ghost Mannequin Effect.”
Confirm your selections and your spec will be created. That means it will be available to you any time you want to submit an order—no need to repeat the spec creation process.
What if you already have a specification you want to add Ghost Mannequin to? Just click the “Edit Specification” button from the Spec section, and you’ll see the option at the bottom of the page.
Submit a Ghost Mannequin retouching order
The only addition to an order flow with Ghost Mannequin is the need to identify what images should be combined. There’s a few ways to do that: you can have Pixelz detect matches, do it by naming scheme, or use the UI to pair images.
The naming scheme option is great for bulk editing, and enables you to use FTP for Ghost Mannequin orders. More on that later—for now let’s stick with the UI.
After you’ve selected your Ghost Mannequin spec and uploaded images, a modal window will open. You choose between automatic matching and manual. There’s no real danger in automatic matching, because you’ll have an opportunity to confirm the automatic pairings.
In my example, I only have two images. That means the automatic matching can’t possibly miss, but I’ll go ahead and do it manually just to show you.
It’s a super simple process. You simply select the images you want to combine and then right click to bring up a context menu. On the menu, select “Combine.”
You’ll see the images stack on top of each other, whereupon one will disappear and an icon will be added to the remaining image. If you click the icon, you can see the images that are intended to be combined and can uncombine them if you like.
And that’s it! Now you place your order like normal, and if you’re a Pixelz Professional subscriber you’ll have your new Ghost Mannequin image by 8:00 a.m. tomorrow morning.
Way easier and way faster than doing it yourself, and adding Ghost Mannequin on to an order only costs 50 cents. That’s hard to beat.
Auto match by file name
If you’re building Ghost Mannequin photography into your workflow and you want to use Pixelz for post-production at scale, you can use a simple file naming scheme to speed up the process.
Simply make sure all your images have the same root name and a different suffix, like this:
myimage.jpg
myimage_2.jpg
myimage_3.jpg
The above will be combined into myimage.jpg.
imagename-main.jpg
imagename-insert.jpg
The above will be combined into imagename.jpg.
The suffix doesn’t really matter, though it can be helpful for clarification purposes. The main thing is that they have the same root and a different suffix. If you do that, Pixelz will automatically detect combinations whether they’re uploaded via FTP or the UI.