
Follow this simple process to create effective, appealing apparel product photos with live models
Step 1: Pick a model
There are three basic factors to consider when choosing a model: (1) the extent to which you feel comfortable working with him or her, (2) whether or not the model will be available to you long term, and (3) how your apparel looks on the model. It’s very important to select one model or several models that you feel comfortable working with; the less you have to fumble around establishing a good flow of communication between you and your model(s), the more efficient and productive your photoshoots will be.
Likewise, in order to create a consistent “look” for your products (which is the sign of an expert in any field), there is great benefit to including the same model(s) throughout all of your product photography. After working with you once or twice, a model will understand your vision and learn to execute exactly what you need with every photograph.
You will also need to carefully consider how your products actually look while being worn by the model(s) you choose—if your apparel doesn’t look immensely flattering and desirable when it’s worn by a particular model, it may be a good idea to find a different model whose body type is suited to your product. Sizing is a key consideration here. Although you may have multiple sizes available in your line, pick just one size and photograph that size throughout all of your product photography.
Step 2: Setup your space
The space you should allot for the shoot depends on the situation. Your model should have enough space to be able to move freely to follow your cues. However, it’s also a good idea not to err on the side of having too large a shooting area. Designating specific backdrop boundaries will not only help your model stay in the frame, but it will also help you know exactly where to aim the camera.

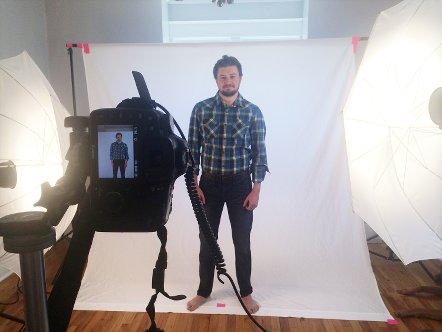
Make sure that you have the proper equipment and space needed to achieve high-quality images. Some examples of necessary equipment, as seen in the above photo, are: a white backdrop such as a sheet or seamless rolled paper, a tripod to mount your camera, and 1-3 continuous softbox ensembles or 1-3 external speedlight and umbrella ensembles (discussed in Step 3).
While you don’t have to use a white backdrop, white will easily emphasize your model and apparel and other colors like black tend to be more difficult to light in session and tend to compromise efficiency in post production.
Likewise, a tripod might not be necessary if you have enough available light, but using one tends to provide better, sharper results. Whatever backdrop color or image stabilization you use, remain consistent and use these settings throughout all of your product photography.
Step 3: Create Just the Right Light
As mentioned earlier, renting or buying proper lighting equipment is another critical requirement to creating effective product images. The most common setups consist of 1-3 continuous softbox lights (with stands) or 1-3 external speedlight and umbrellas (with stands).
When considering your photography lighting setup, remember that your goal should be to find a way to mimic the softness of natural window light; softboxes do this automatically, but even with umbrellas, speedlights can sometimes be too harsh and direct.
If that’s the case, simply angle your speedlights off to either side of the model so that the light bounces off of nearby walls, as shown in the above image. Don’t be afraid to experiment—only experiment before the photoshoot to maximize your efficiency when the model arrives.
Step 4: Position Your Model
Once your lighting and backdrop setup is finalized and your model arrives for the photoshoot, it’s up to you to explain your vision to the model and effectively position the model in that prepared space to achieve your vision. The easiest way to ensure that your model is standing right where you need him or her to be is to place an “X” on the floor directly in line with your camera, either beneath the model’s feet so that he or she knows where to stand or closer to the camera so that he or she can “line up” with it. Whichever you choose, the “X” establishes a “target” for your model to position themselves in relation to, ensuring that you don’t have to make a lot of adjustments to keep the model right where you need them to be in your frame.
Step 5: Shoot with Wide Framing
Because there is a large amount of variation in the web standards for crop and sizing, it is a good idea to shoot your product photos with “wide framing.” This simply means that you should leave ample space on all sides of the model to ensure that you’re able to crop the image down to comply with web requirements. It’s better to have too much space, which can be fixed with a bit of cropping, than too little space, which might render an image unusable. Likewise, always keep your model’s arms and legs in the frame.
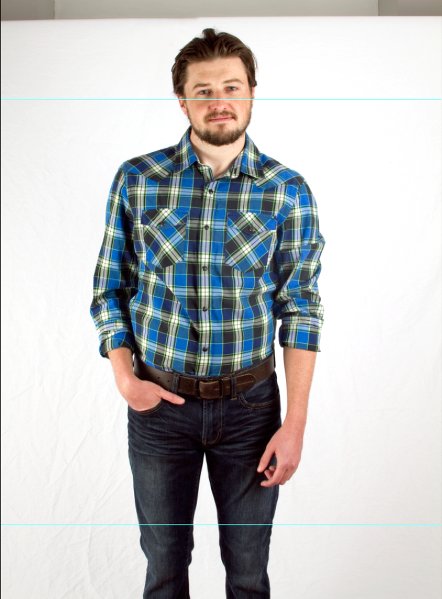
This is an example of product image before it has been cropped, which leaves ample space around the model to decide my crop later. There are two blue guide lines above the nose and above the knee to show where my crop will be after retouched.
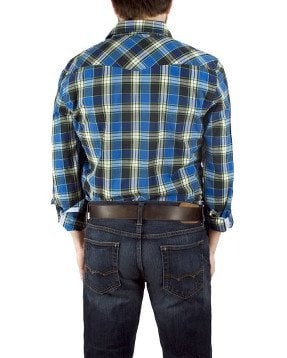
While some companies and brands do include the faces and expressions of their models in their product images, many crop out those identifying features to minimize distraction from the apparel in question. Cropping models’ faces is a great option if you’re just starting out because it can potentially save a good deal of time and money.
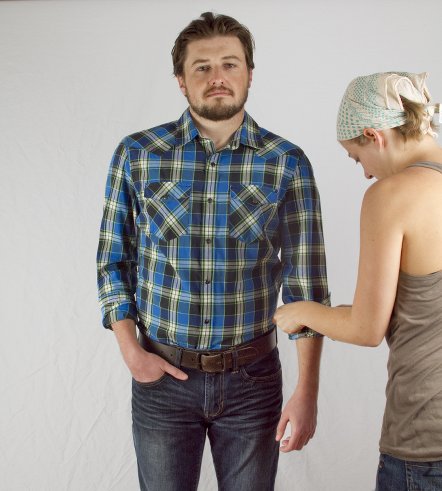
Step 6: Direct Your Model


These standard poses are simple yet effective.
Throughout the photoshoot, the model will be looking to you for direction and instruction. The photos are supposed to fulfill your vision, after all. Keep your instructions clear by using precise commands—for example: if you want the model to look in a particular direction, tell them to look at a particular object in that direction instead of pointing. In most cases, remember that the simpler a pose is, such as in the above photos, the better. Elaborate poses may distract prospective customers from your product itself or make it difficult to crop out the model’s face if need be.
It is also a good idea to take multiple frames of as many different angles and poses as possible. This will give you a large amount of variety to choose from during post-processing and will allow you to select only the best images to promote your product.
Step 7: Post-Production
Make sure to allot time for post-production in your project workflow. You might choose to make the necessary edits to your images yourself, but sometimes outsourcing that labor can free up your time and energy to work on other aspects of your business. If you do choose to hire someone else to edit your images, make sure to hire a professional who can help to make your images look consistent. You should also make sure to inform them of your website’s specifications, such as with cropping and sizing. Whether you do the edits yourself or outsource photo editing this step of the process, these are the key adjustments that you will probably need to make to prepare your photos for the web:
- Lighting adjustment
- Skin touch-ups
- Wrinkle removal
- Product straightening
- Cropping and resizing
Remember, the main purpose of using a live model is to make it easier to give your garment shape and character by allowing your customers to envision how products might fit on them. These seven easy steps will get you well on your way to creating professional and consistent images that really make an impression with prospective customers.