Step 1: Optimize your Product Images
Like all eCommerce, Google Shopping is a visual experience. Google essentially combines merchants’ product feeds into category pages for comparison shopping and gives shoppers an image of the product and price. This means your product images are the most important part of your listing.
If you want to be found in Google Shopping, there is a simple method: do what Google tells you.
Google is a data driven company that wants to be useful to shoppers and facilitate sales. They want you to succeed. They do a great job of telling you what to do, and just as importantly what not to do. Get compliant first, and then you can take further action to distinguish yourself from the competition. First, the obvious: don’t break their rules!
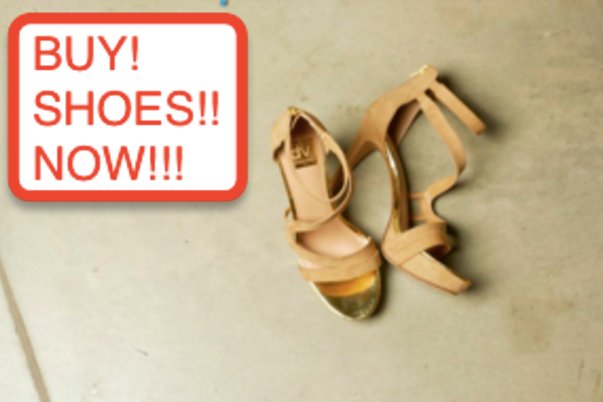
Don’t overlay text on your product image or break other Google Shopping rules.
These are Google’s indicators of low image quality:
- Don’t submit images smaller than 32×32 pixels or larger than 64 megapixels (apparel images must be at least 250×250 pixels)
- Don’t scale up images or thumbnails
- Don’t use watermark, logo, or text overlay
- Don’t use borders around the image
- Don’t include more than one product in the image, unless it’s a bundle
- Don’t use a multicolored, dark, or patterned background
If you do any of the above, it won’t just impact your sales; it will prevent them. Google will either not allow (“disapprove”) your initial listing or they’ll delist you.
![]()
Select “Google Shopping” from the “Marketplaces” area when creating a spec or placing an order.
You can ensure you have compliant images that are optimized for Google Shopping in post-production processing by using the “Google Shopping” order specification within your Pixelz account. A few clicks now will prevent the headache of regaining Google’s trust after disapproval. Google performs frequent quality checks, and if they find compliance violations it can lead to suspension of your account and a frustrating review process.
If you are selling your product through additional marketplaces, platforms, comparison shopping engines, or other channels, you may be able to combine those into a single Pixelz order specification. When product image standards are compatible, you can submit a single order and ensure that your images will be compliant at every selected destination. Google Shopping, Amazon Marketplace, Amazon Product Ads, eBay, Jet, Rakuten, and many more options are available within your Pixelz account. (See a quick screenshot walkthrough.)

Do this with your product images
Start by following Google’s guidelines, then kick it up a notch with planning, quality photography, and professional post-production processing.
If you follow Google’s rules and our advice you can create professional product images for all marketplaces.
Google gives suggestions for improving image quality.
- Use a solid white, gray, or light colored background
- Show the product in clear, even lighting
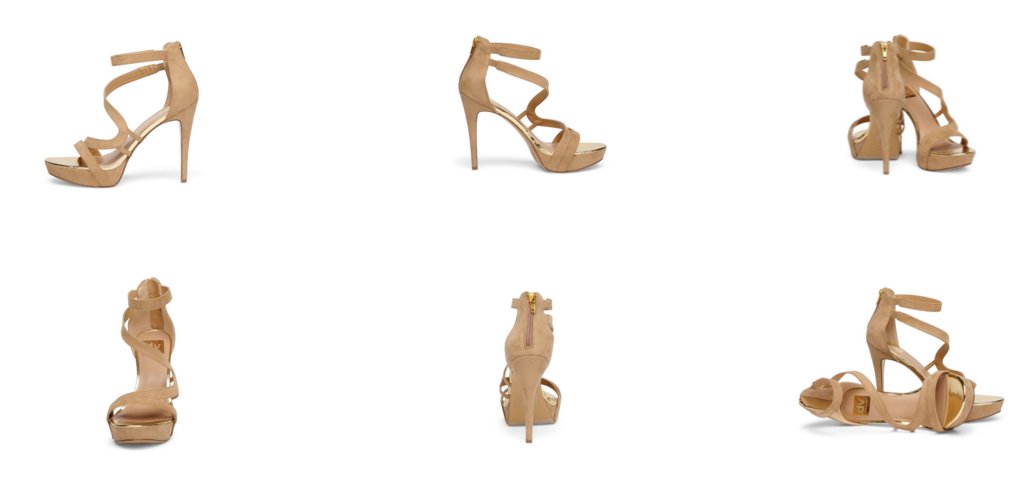
- Show the product with a view that clearly represents the item being sold. Back views and close-ups can be used for additional images, but not the main image.
- Show the product at the correct scale, not too big or too small. A product should ideally fill no less than 75%, but not more than 90%, of the full image.
- Make sure the image is free of blur, noise, excessive jpeg artifacts, or other image artifacts like pixelation, fringing, and fading out.
Overarching principles of product imagery
Whether you’re adding images to your own website, uploading them to an eCommerce marketplace like Amazon, or submitting them to a comparison shopping engine like Google Shopping, the guiding principles of product photography remain the same. Consistent high quality images improve sales.
Product category pages should be clean and easy to navigate. Minimize distractions by consistently cropping and aligning. You should consistently use a white or light grey background. Add depth with shadows, and apparel images should be shown on-body to demonstrate shape and fit.
Planning your photoshoot and post-production processing are the key to achieving consistent, professional product images.
Display optimized product images directly in Google search results.
Step 2: Create a Google Merchant account

Google Merchant accounts are free and easy to manage. In a rarity for Google, you can even speak to a human rep if you need help.
The Google Merchant Center allows you to upload product data and create Shopping campaigns to drive sales. In addition to the millions of Google users you’re opening yourself up to, Google’s location based technology can drive online shoppers to your brick and mortar store with features like “in-stock” availability checking.
Step 3: Optimize your Google data feed
So what is a Google Shopping data feed, anyway?
Optimizing your product images is crucial and is where you should dedicate most of your resources. The next step to optimizing your Google Shopping listing is to understand and target the additional pieces of your listing. What we’re calling “your listing” is what Google calls a “data feed.”
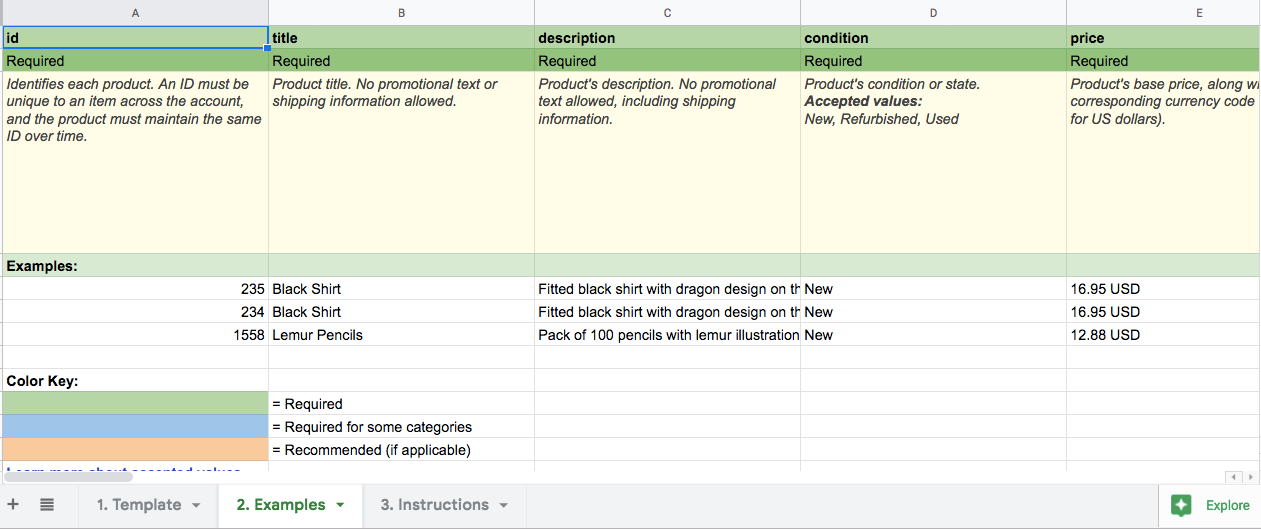
An example Google Shopping data feed.
When you are adding products to your Google Merchant account, you will be submitting the following basic product information in a Google product data feed:
ID, Title, Description, Google product category, Product type, Link, Mobile link, Image link, Additional image link, Condition, Availability, Availability date, Price, Sale price, Sale price, effective date.
There are additional fields that may be provided, like gender for apparel. Take a close look at Google’s attributes chart and make sure you provide as much detail as possible related to your product. Most are self explanatory, but a few allow for subjective interpretation and can influence the success of your listing.

There are many shared Google data feed requirements, but it is wise to follow category specific recommendations. Source: google.com
7 steps to take advantage of Google’s reach, brand credibility, and powerful marketing tools.
Google data feed attributes to focus on
ID – This is a unique code that identifies your product for the machines. The most important thing to remember here is not to change it. If you change it later, you will effectively be relisting your product and resetting your Quality Score (in essence the reputation your item has built with Google).
Title – Be relevant, clear, accurate, and descriptive. Shorter is better – long titles may get truncated. Don’t overdo keywords by repeating them with slight variations, like “bestselling, bestseller, best seller.” Don’t get gimmicky and do the Internet version of shouting for attention with all caps, exclamation points, or FuNnY Sp3ll1ng and capitalization. Any one of those techniques can result in disapproval of your product listing.
Description – You can submit up to 5,000 characters, but Google recommends something in the 500 to 1000 range. Lead off with relevant information to your customer, like technical attributes and special features, but remember who you’re writing for: it’s as much about informing the search engine as it is marketing to customers. Include visually obvious features so Google can find you when a customer searches for specific patterns, colors, shapes, and other design attributes.
Image link – This is the primary image for your listing and must be the first image shoppers see if they click through to your page. Make it beautiful using our earlier optimization instructions.
Additional image link – Submit more images of your product! The more images you provide the better, as additional high quality images have been correlated to increased sales. When you’re photographing apparel, shoot the front and back, each 45 degree angle, left and right sides, and closeups of any interesting detail. Submit all of these to your Google Merchant account as an “additional image link.”
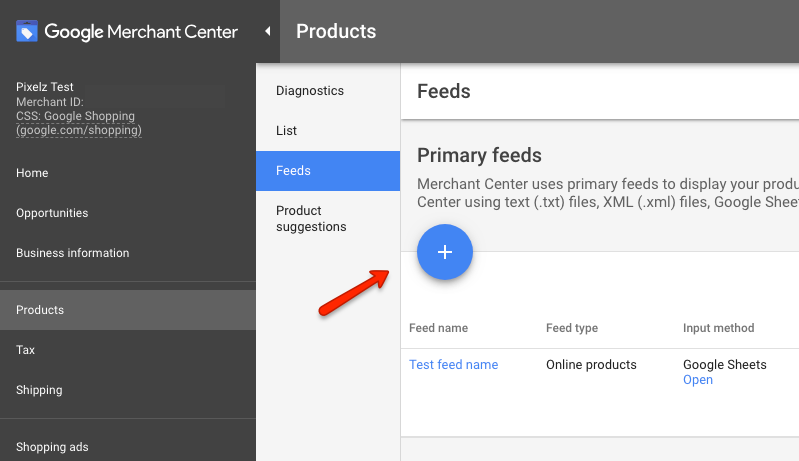
Step 4: Add your data feed
Press the blue circular “+” button in the "Feeds" area when you’re ready to list your products with Google Shopping. Remember that Google Shopping sends customers to your site, so don’t list items unless they’re available at your site.
Add your data feed when your product images and website are ready.
Basic information
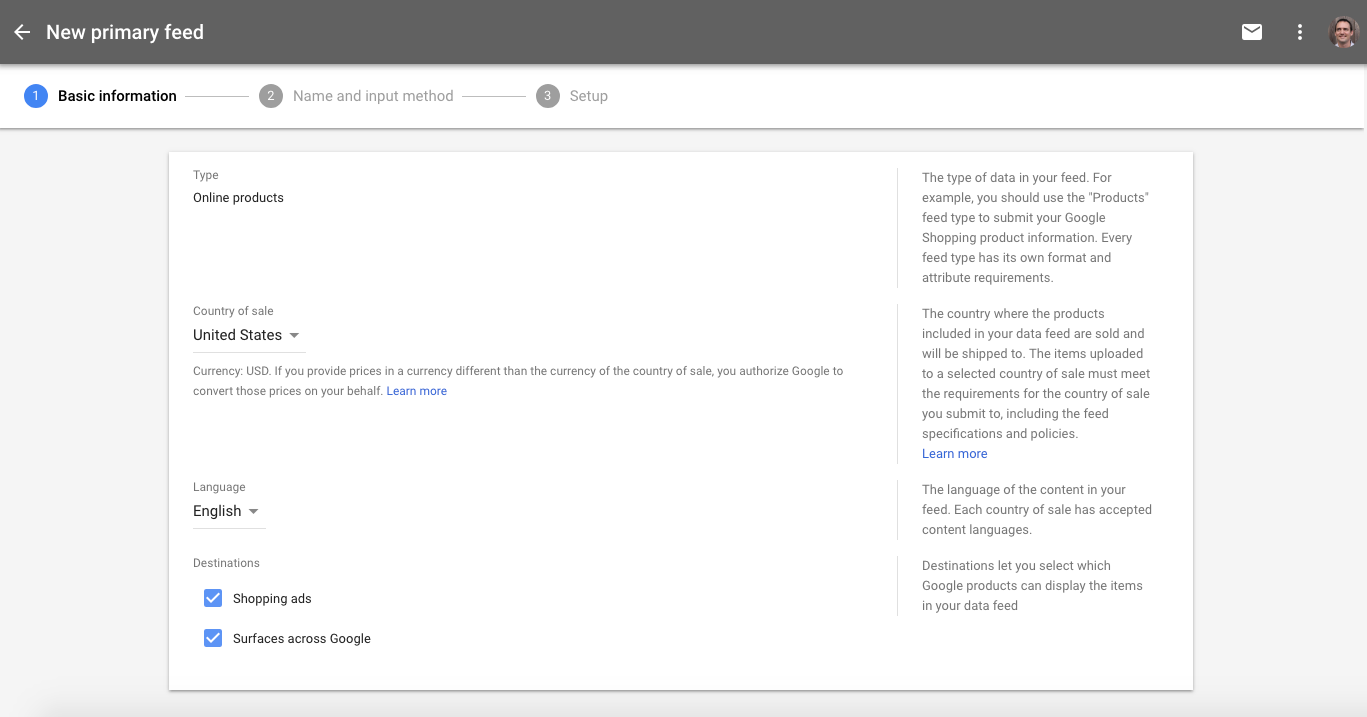
Pick a category, country of sale, and language.
Google has really streamlined the setup process. You may very well be able to pick a language and then click through the first step.
The feed “Type” defaults to "Online products" and at the time of this writing can't be changed. The "Country of sale" determines where Google will show your product and where it will be shipped to. It will come with a default currency you can adjust after setup, if necessary. The "Language" is the language you're using in your feed (think product descriptions). Your choices will be limited by your country of sale: for example, a United States selection only allows English, Spanish, or Chinese.
For "Destinations," "Shopping ads" and "Surfaces across Google" are auto-selected. This is where you control where Google can advertise for you. "Shopping ads" display on the familiar results page of a Google search. Google provides very thin info on what "Surfaces across Google" entails ("various touchpoints" they say), but I suspect it means places like Google Image Search, Google Maps, YouTube, maybe some Android related opportunities, and whomever they currently have ad service partnerships with. It's vague for a reason, and I believe that's because the meaning is constantly changing.
Name and input method
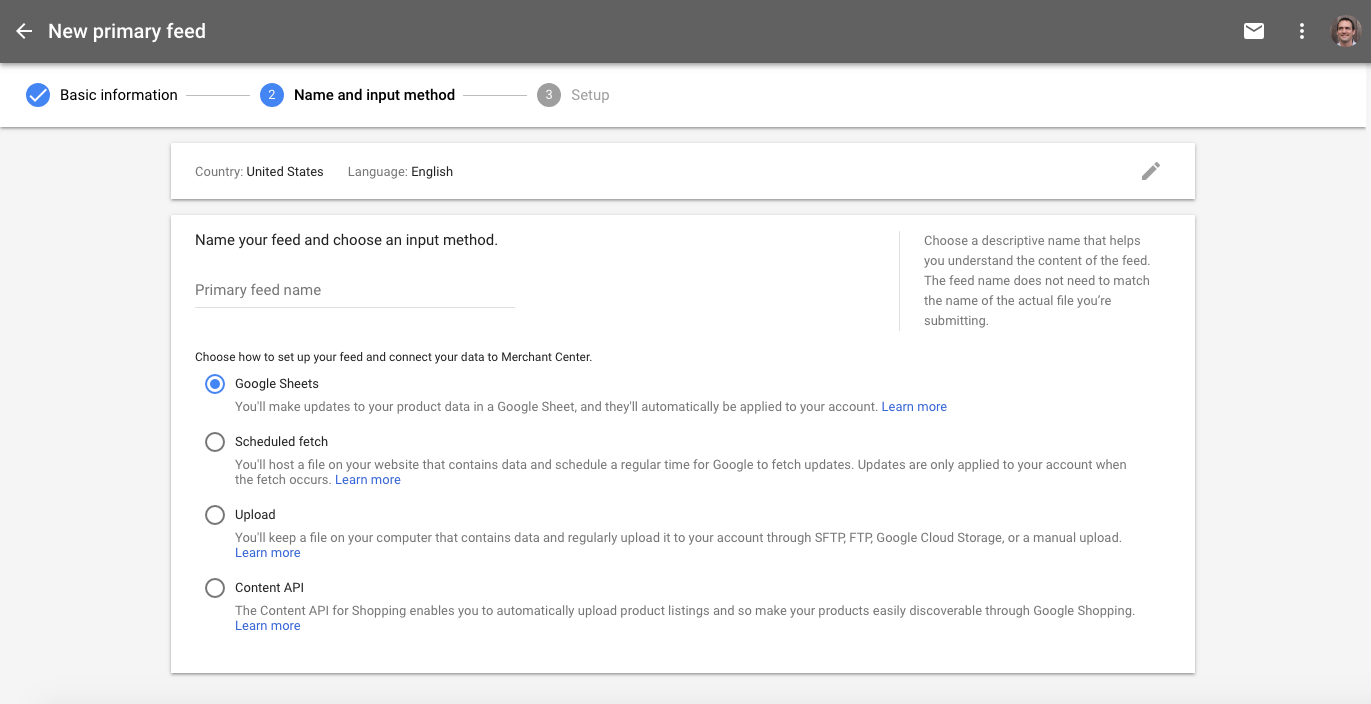
Select the feed type that is most convenient for you.
Make your "Primary feed name" something memorable and easily understood. It doesn't have specific requirements and it isn't going to be customer facing, so just make sure you and your colleagues will intuitively recognize what the name is referencing. A brand name, a store location name, etc.
The “input method” step of adding your data feed is flexible and boils down to where you want to maintain your listings. “Google Sheets” allows you to keep your data in the cloud using familiar spreadsheet technology. “Scheduled fetch” will get data from a file on your website. “Upload” puts the onus on you, allowing you to apply updates whenever you prefer through a variety of methods, like SFTP or manual upload. "Content API" allows you to continuously apply updates to your feed programmatically by connecting it to your own website through custom development.
Select the option that makes the most sense for you. If you have a large or complex feed that will require frequent updates, and you have developer resources, API is the way to go. Sheets and regular uploads are the most user friendly manual options, in my opinion. Scheduled fetch feels a little outdated now that Google finally has the Content API up and running.
Setup
The feed “Setup” step will depend on the input method you selected. If you are using Google Sheets, you can use an existing sheet or let Google create one for you.
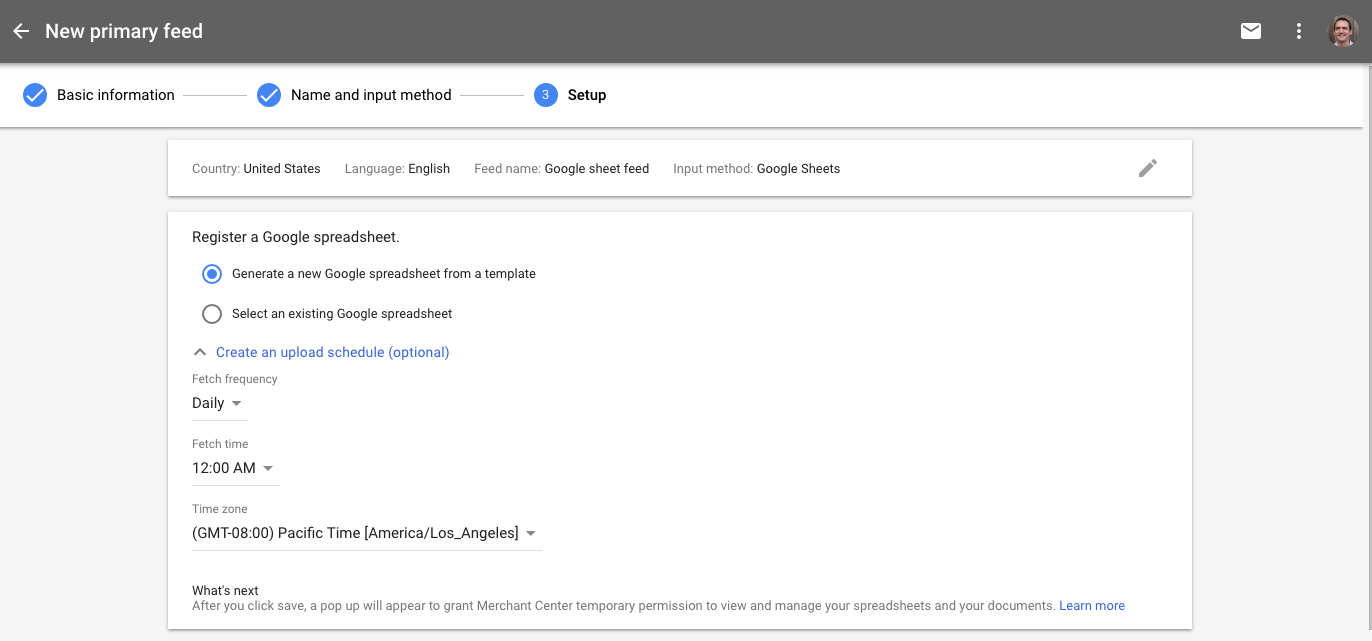
If using Sheets, select an existing sheet or have Google generate one for you. You can optionally schedule fetches.

If you have scheduled fetches, you need to provide the name and URL of your file, set a fetch time and frequency, and provide password information if you’ve protected the data.
When you have completed adding your data feed, it will appear on the “Feeds” page of your account.
Step 5: Shopping Campaigns
You’re probably familiar with how Google Ads (formerly AdWords) works, so we won’t go too deep into it. In a nutshell, you engage in an ad auction where you set minimum and maximum bid amounts for certain search terms. You’re charged when someone clicks on one of your ads.
The Google Merchant Center (where you created your data feed) is a complementary piece to Google Ads. If you don’t already have an Ads account, create one by following Google’s guided Google Ads (formerly AdWords) setup.
Shopping campaigns (how we actually advertise the products from your data feed) can be created from the Merchant Center or Ads, but must be managed from within your Ads account. Before you can create a campaign, you must link your Google Merchant and Ads accounts from within your Merchant account.

Link your Google Ads account to your Google Merchant account from within the Merchant Center.
Login to your Merchant account, click the three vertical dots in the upper right corner of your screen, and then select "Account linking" from the context menu.
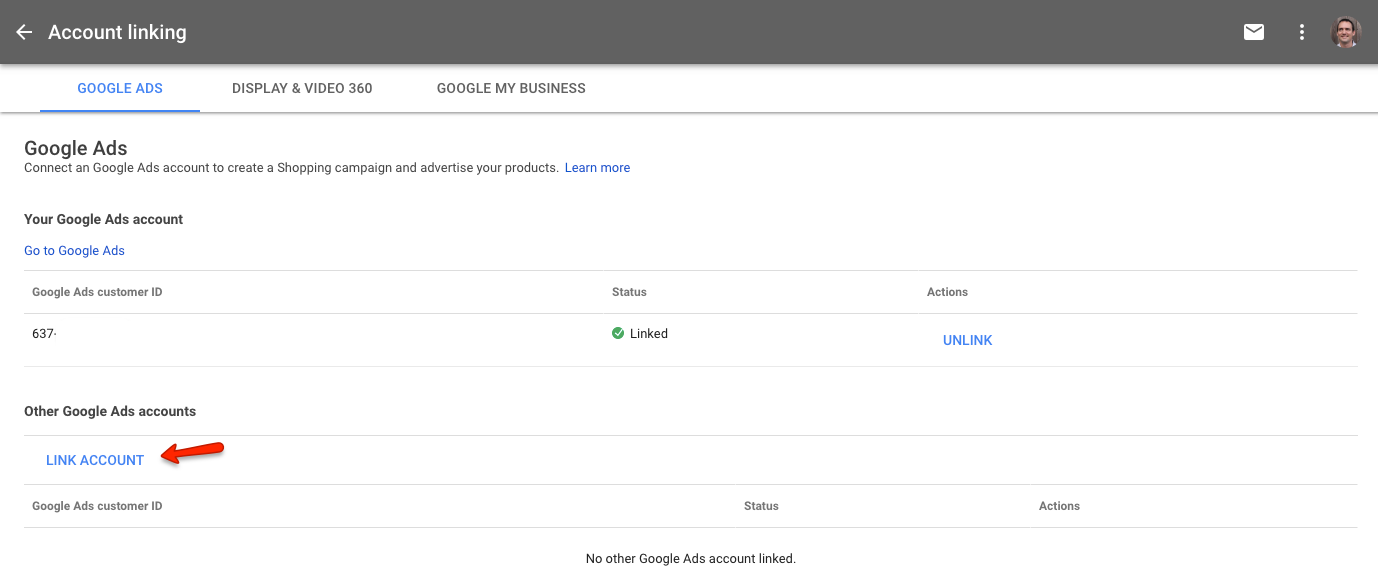
Press "LINK ACCOUNT" and follow instructions to send a link request to a Google Ads customer ID.
Pressing the "LINK ACCOUNT" blue link text will open an input field for you to provide a Google Ads customer ID. You can then send a link request which the owner of the Ads Id can accept in order to link accounts.
Step 6: Create a Shopping Campaign
You’ve got your product ready, your data feed submitted to Google, and your Merchant and Ads (AdWords) accounts linked. Now you need to reach out to customers by creating a Shopping Campaign. This is how you choose whom to target with your ads and how much you want to spend.
Shopping Campaigns create Product Listing Ads which have a big advantage over traditional text based ads for a number of reasons:
- Your product images are the primary piece of the listing. Shopping is a visual experience and Google reports that Product Listing Ads may double or triple your clickthrough rate compared to text ads.
- Anyone clicking on your ad has already seen your product and its price, so they are better qualified leads.
- Shopping Campaigns use your data feed instead of keywords, so ads are more targeted.
- More than one ad can appear for a given search, which improves your odds of displaying a relevant product.
You can configure some Shopping ads options from your Merchant account, but anything sophisticated must be setup and managed in Ads.
It’s pretty simple to setup a Shopping Campaign from within your Ads account. Go to “Shopping campaigns,” select the “Campaigns” tab, and press the blue circular "+" button.
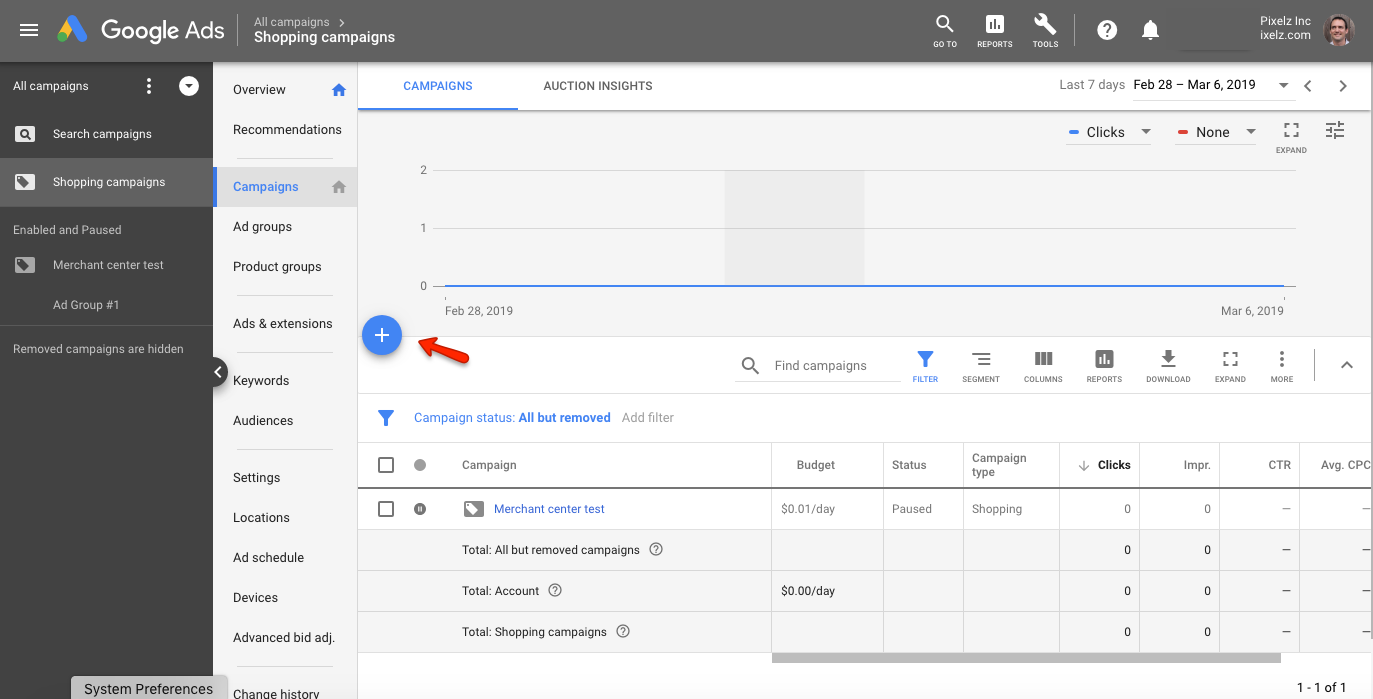
Open the Shopping campaign creation wizard within Google Ads.
Google will then hold your hand through a campaign creation wizard where they help you define a successful campaign and then work through the settings to achieve it.
Step 7: Streamline your workflow and stay up to date
Keep those products coming! Building an efficient product photography studio will pay off in the short and long run. You want to be pushing products to your website and channels like Google Shopping as fast as possible. You don’t have to have a huge budget to be as productive as a fast fashion retailer.
Once you’ve set up your Google Shopping data feed, keep it up to date or Google will punish your listings. Optimally, use the Content API. If you can't, develop a reporting tool that looks at your website or CMS and outputs the required data for Google to fetch.
Be a Leader
Experiment. Innovate. Try new markets and new techniques. If something doesn’t work, look at the lessons you’ve learned and let them inform your next decision. There are millions of eCommerce stores out there and you need to find what makes you unique.
Anywhere you can improve efficiency and remove time waste, you should. Take advantage of resources like Pixelz photo editing service in order to easily create Google Shopping compliant images. Doing so will free you to do what you do best: sell!