
Less is more when retouching models!
There is one rule of thumb in skin retouching: the more natural, the better. The main reason to retouch a model is to remove distraction and keep the focus on your product. If you overdo it, the retouching itself will become a distraction and reflect negatively on your product. It is important to keep your models looking their best while maintaining authenticity.
There are three main points of emphasis to focus on when working on images with models. We will show you how to use Adobe Photoshop to make sure your product fits the model, balance skin tones, and remove distracting skin markings.
Following these steps will keep your imagery consistent and distraction free.
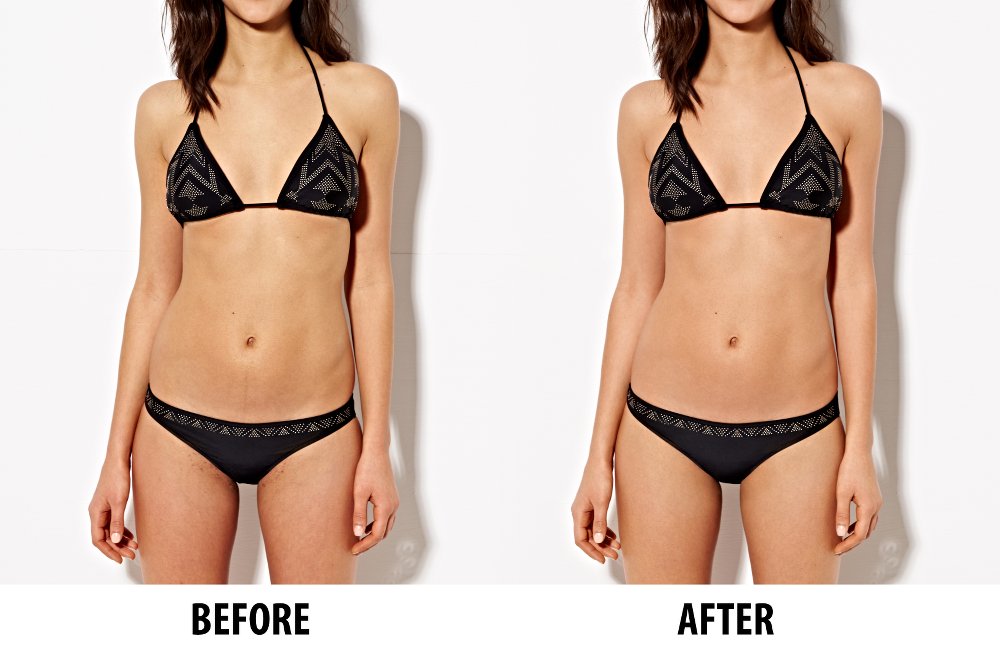
A before and after of our image after following the steps below.
1. Make sure the product fits the model.
Fit should be watched carefully during photography, but sometimes a model’s movement can lead to an unflattering fit. Make sure the product fits nicely on the model by looking closely at its actual shape compared to its ideal shape.
Best tool to use:
Liquify tool–to adjust the product and curvature of fit on model. (shortcut key: SHIFT COMMAND X)
Skin Retouching using Adobe Photoshop – Liquify Tool from Pixelz on Vimeo.
With this tool, you can adjust unwanted bumps and curves on the product or adjust your model’s body type. Most e-commerce brands tend to leave the model’s natural shape as is. Start from the top of the model and work your way down, looking for things that should ideally not be there.
- Open your image and duplicate your background.
- Select the body and open the liquify tool.
- Use the brush to maneuver the parts of the body you want to push in or pull out. You can change the brush size to help with both smaller areas and larger areas that need a broad adjustment.
- When you are done, make sure you didn’t move any parts of the image you didn’t intend to. To remove adjustments in an area, try holding “command” and brushing over the area- it should bring back the original image. Click “okay” and you should see your adjustments made on your new layer!
2. Balance skin tones.
Typically skin tones do not match throughout an entire body. Sometimes our face is lighter than our arms, or our hands and legs are darker than our upper body. In order to make your models look their best, it is extremely important to match every part of their body to the right skin tone color and tone consistency. Making sure their skin tones match overall will help the model look their best and eliminate potential distractions from the product. This will also help you set a standard skintone for each model, allowing consistency across all images using this model.
Best tools to use:
Curves– to adjust the brightness and darkness of the skin selected.
Skin Retouching using Adobe Photoshop – Curves fromPixelz on Vimeo.
The curves tool can adjust the brightness or contrast of a body part. For example: if legs are darker than the upper body, choose to even the two by brightening the bottom half and darkening the top half.
- Make an overall selection of the model and an overall selection of the background on a masked out curves layer. This will be your overall adjustment but also will help you link all of your additional adjustments to it.
- Select the part of the body that needs brightening and make sure to refine the edges so it’s a looser mask. Now select the curves adjustment to create a new adjustment layer. Make your adjustments by brightening or darkening the selected area. Now move on to another area that needs to be brightened or darkened.
- Link the masked adjustment layers to your original overall mask. This will help your layers stay cohesive and within the masked guidelines.
Hue & Saturation– to adjust the color hue of the skin selected.
Skin Retouching using Adobe Photoshop – Hue / Saturation fromPixelz on Vimeo.
Some model’s skin tone will show different colors in certain parts. For example, when we stand for long periods of time (like models do) our circulation tends to show more in our hands and legs; they look more red and dark. Arms and faces that catch more light tend to look washed out in comparison. The hue/saturation tool can help take down some redness or add/decrease some warmth of saturation in the skin tone.
- Make a loose selection of the area needing work.
- Add a new adjustment hue/saturation layer and adjust the color as needed. In this instance, the top half of her body needed some yellow changed to red and the bottom half needed her red changed more to yellow. This helped balance overall evenly.
- Continue throughout the body to make sure all areas are balanced. Check the neck, face, hands, legs, feet; it is okay to have many adjustment layers for each individual body part to make it look all over even.
3. Remove unwanted / distracting skin markings.
This may seem extremely subjective, but the more you do it, the easier it will be to see and understand what needs to be removed. Keep your models looking natural by understanding what is there all the time versus only sometimes. For example, leave any freckles or birthmarks unless they are too distracting to the product, because they are there naturally all the time. Remove any blemishes, bruises, cuts, etc. because they are not naturally there all the time. Separating the temporary from the permanent will help post production skin retouching move faster and look better. The more you remove, the more work you will have to do on every image to be consistent.
Best tools to use:
Healing Brush –to remove unwanted blemishes, bumps, bruises, cuts, wrinkles on fabrics, hair, etc. (shortcut key: to select good area- hold option then brush over problem area)
Skin Retouching using Adobe Photoshop – Healing Brush fromPixelz on Vimeo.
The “healing brush” will be a major tool in continual use while working in Photoshop. This tool will help you remove all unwanted blemishes, cuts, wrinkles, etc. When using it, select an area near the part to be removed and brush over it to seamlessly blend and match the existing areas around it. It’s really a bit of magic!
- Make sure you are working on the duplicated layer where you made your liquified changes.
- Hold option near the area you want to work on, and click down to select the area you want to use.
- Stop holding option and brush over the area, watching it seamlessly blend into the surrounding area.
- Continue moving throughout the skin doing the same thing, selecting and brushing as you go.
Dodge & Burn–to remove blotchiness in skin for evenness overall. (shortcut key: to switch back and forth between dodge and burn, hold the option button while brushing)
Skin Retouching using Adobe Photoshop Dodge & Burn fromPixelz on Vimeo.
The dodge and burn tool helps to even out the blotchiness skin tends to get when standing for too long. It can also help lighten bruises or darken knees, and even darken areas that are too bright like highlights.
- Make a new empty layer and fill it with grey.
- Turn this layer to soft light.
- Brush/burn around the areas you need to darken on top of the grey layer. Brush/dodge on the grey layer to lighten areas that need brightening by holding the option key.
- Toggle back and forth to dodge and burn as you work. Turn on and off the grey layer to see your adjustments and continue working until you have your desired look.
Takeaways
Remember to make sure the product fits the model, balance skin tones, and remove unnatural skin markings. Focusing on these 3 key points of emphasis while retouching skin will help you stay consistent and productive in your post production processing. Remember: less is more, and natural is better. Helping your models look their best without getting carried away will keep the focus on your product.